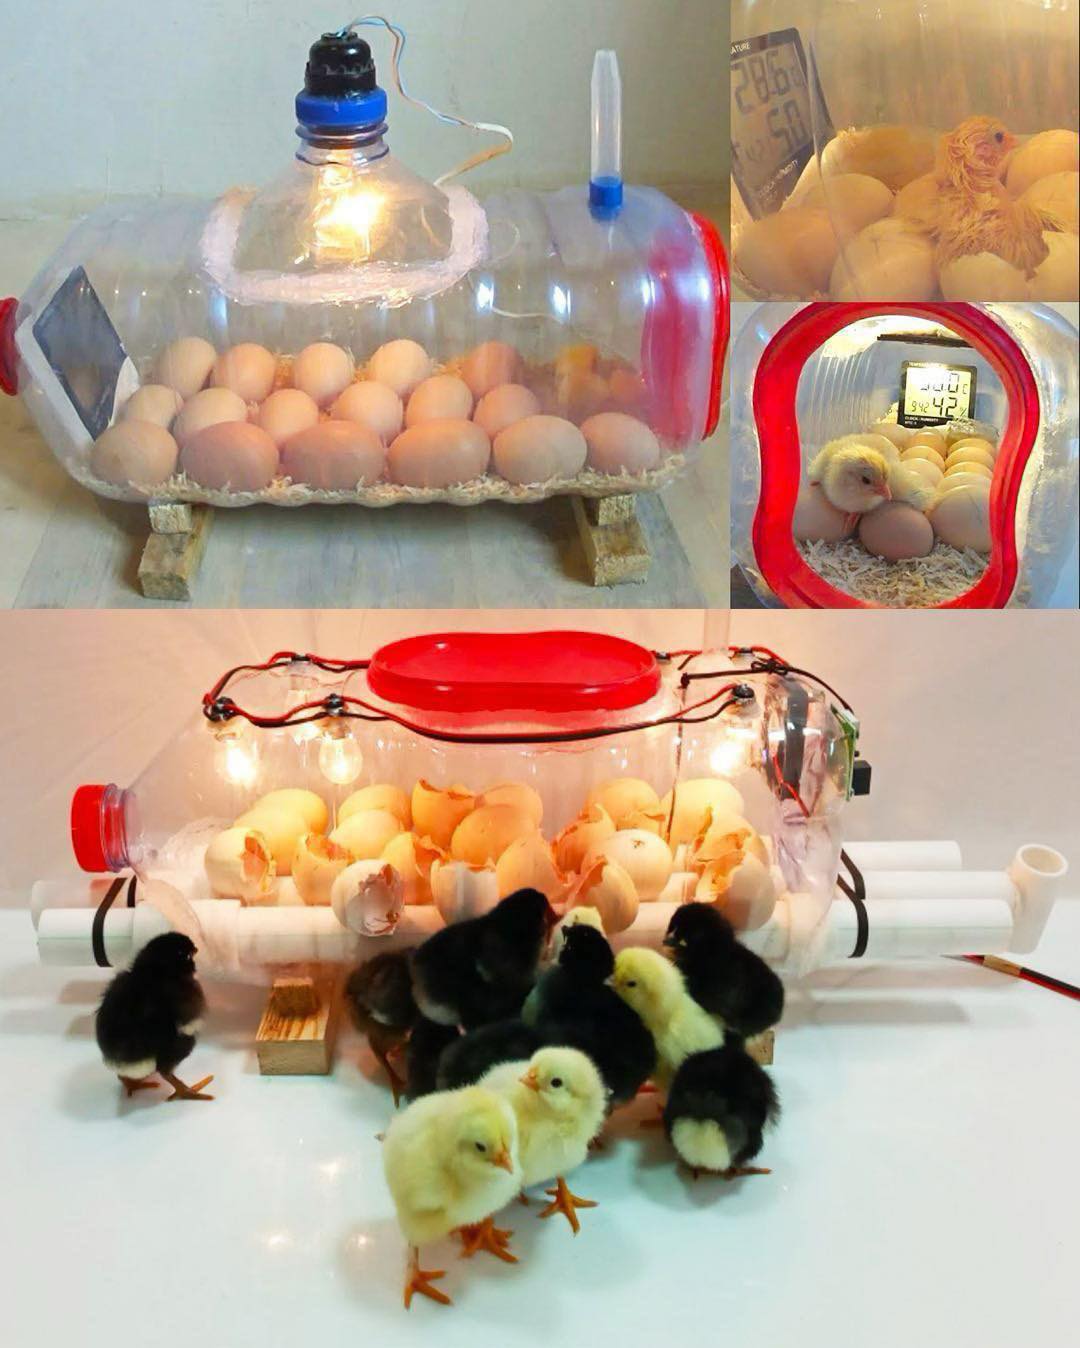
DIY Water Bottle Egg Incubator: A Step-by-Step Guide
Hatching eggs at home doesn’t require expensive equipment—with a plastic water bottle, basic tools, and careful monitoring, you can build a functional, low-cost incubator. This guide covers construction, temperature control, egg care, and troubleshooting for successful hatching.
Why Use a Water Bottle Incubator?
✅ Cost-effective – Uses recycled materials
✅ Compact & portable – Great for small batches of eggs
✅ Educational – Perfect for kids or beginner poultry keepers
Hatching Success Rate: With proper temperature, humidity, and turning, this method can achieve 50–80% hatch rates (similar to basic store-bought incubators).
Materials Needed
| Item | Purpose |
|---|---|
| 5L (or larger) plastic water bottle | Main incubator body |
| 25W incandescent bulb or reptile heat lamp | Heat source |
| Thermometer & hygrometer | Monitor temp/humidity |
| Egg carton or foam pad | Stabilize eggs |
| Small fan (optional) | Improve air circulation |
| Spray bottle | Adjust humidity |
| Scissors/box cutter & drill | Cutting/ventilation |
| Tape (aluminum foil tape works best) | Secure components |
Step-by-Step Construction
1. Prepare the Bottle
- Thoroughly clean the bottle (no residue).
- Cut a large door on the side (big enough to place eggs inside).
- Reinforce edges with tape to prevent cracks.
2. Install Heat Source
- Option 1 (Bulb): Drill a hole in the bottle cap, insert the bulb, and secure it.
- Option 2 (Heat Mat): Tape a reptile heat mat to the bottom or side.
- Test heat before adding eggs (aim for 99.5°F/37.5°C).
3. Stabilize Eggs
- Place an egg carton or foam pad inside to prevent rolling.
- Space eggs evenly (don’t overcrowd).
4. Add Ventilation
- Drill 4–6 small holes (⅛ inch) near the top and bottom for airflow.
- Optional: Add a USB fan for better circulation.
5. Monitor Conditions
- Place a digital thermometer/hygrometer inside.
- Ideal settings:
- Temp: 99–100°F (37.2–37.8°C)
- Humidity: 45–55% (increase to 65–75% last 3 days).
Egg Care During Incubation
1. Turning the Eggs
- Turn eggs 3–5x daily (prevents embryo sticking).
- Mark eggs with “X” and “O” to track turns.
- Stop turning on Day 18 (let chicks position for hatching).
2. Humidity Control
- Low humidity? Add a damp sponge or mist lightly.
- Too humid? Open vents slightly.
3. Candling (Checking Development)
- Use a bright flashlight in a dark room on Days 7, 14, and 18.
- Look for:
- Veins (Day 7) = Healthy embryo
- Dark mass (Day 14) = Growing chick
- Air sac changes (Day 18) = Ready to hatch
Troubleshooting Common Issues
| Problem | Solution |
|---|---|
| Temp too high | Reduce bulb wattage or increase ventilation |
| Temp too low | Use a higher-watt bulb or insulate with foil |
| Low hatch rate | Check consistent turning, humidity, and temp |
| Eggs not hatching | Verify fertility (store-bought eggs may not be fertilized) |
Safety Tips
⚠️ Avoid overheating – Check temp frequently.
⚠️ Keep away from children/pets – Bulbs can get hot.
⚠️ Use a surge protector – Prevent electrical fires.
Final Thoughts
This water bottle incubator is a fun, low-budget way to hatch eggs at home. While not as precise as commercial incubators, it works well for small batches with careful monitoring.
Want to improve your setup? Try adding an automatic egg turner or Wi-Fi thermometer for better control!
Have you tried this method? Share your hatching stories below! 🐣